
With a digital certificate we will save time, time that we can use to be more productive in our work, to be with our family, friends or whatever we want. But, once we have downloaded this certificate, do we know how to install it correctly or export it? Let’s see how to do all this for devices that have Windows as their operating system.
Digital certificates have made life much easier for individuals and companies, avoiding long waits to complete an administrative procedure and speeding up the digital signature of documents.
In order to enjoy the benefits of using in Windows a digital certificate issued by a CSP (Certification Service Provider), formerly known as Certification Authority, we will need to know certain indications by which we can install it and/or create backup copies. These are described below.
Differences between installing and exporting a digital certificate
First of all, we must clarify what each process consists of in order to get an idea of what differentiates them.
It is very simple. When we are installing or importing a digital certificate, we are saving in the operating system all the necessary computer files for it to work correctly.
On the other hand, exporting a digital certificate usually involves making a backup copy of it. With this copy we will be able to use it in another device, store it in another place, such as a pendrive, or install it in another operating system.
Installing a digital certificate in Windows
Preliminary considerations:
Before starting with the actual installation of the digital certificate, we must make sure that the operating system is ready to carry it out successfully. We will start by checking that we have the latest version and update it if the answer is negative.
In addition, while the installation is running, we should not update the computer, nor change the browser or user, as we run the risk of the system suspecting that we are impersonating an identity and stopping the process. It is also recommended to deactivate the antivirus.
Installation of a digital certificate in Windows
The first thing we will have to do is to identify which certificate we want to install. These are easily identifiable, we will only have to pay attention to the file extension, which will be .pfx or .p12.
Once located, we double-click and, automatically, Windows will show us a wizard for the installation of the certificate.
We can also run the wizard directly using the following sequence: Start > Run and typing “certmgr.msc”.
The first thing this wizard will ask us is whether we want the certificate to be available for the user we are currently logged in with or for the whole team. For security reasons we recommend the first option.
Next we will have to specify the path where the certificate is located, either by typing it or by clicking on “browse” and navigating through the different folders.
Once this is done, the Windows wizard will ask us to enter the password that protects the certificate. This password is usually provided when downloading the digital certificate from the certificate authority’s website. If it is a certificate that has been imported, we will have to enter the password that we established when exporting it.
In the same window there are several selectable options, which are explained below:
- Enable secure private key protection. If enabled, we will be notified each time the certificate is used. At the end of the installation we will be offered several security options in this regard, such as implementing a second password or simply sending such notification.
- Mark this key as exportable. It will allow to make as many copies of the certificate as we want. This choice cannot be changed later.
- Include all extended properties. We leave it selected.

The following screen will show us where we want to store the certificate. In this case we will let Windows choose automatically where to do it, since if you try to do it manually and the chosen store does not correspond with the one that according to Windows should be, it will not allow to carry out the action.
The automatic storage will be done according to the type of digital certificate. The available storages are:
- My certificates: here will go those that have a private key.
- Other persons: if you only have a public key.
- Trusted entities: if it is a root certificate, they usually have a .crt extension.
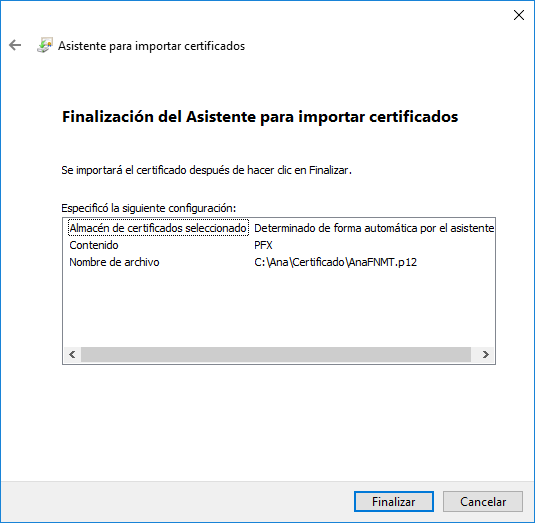
Finally, the wizard will present a final window with a summary of the installation data. Once we have checked and verified that everything is correct, we will click on the finish button to have our digital certificate installed in the computer.
Exporting a digital certificate in Windows
Making a backup copy of our digital certificate is vital to avoid having to go through the process of getting a new one in case we lose it for any reason.
The steps to follow to export a digital certificate will depend on the Internet browser in which it is installed. Although they are very similar procedures, there are slight differences between them.
Exporting a digital certificate in Google Chrome
To export a certificate with Google Chrome we will have to click on “Customize and Control Google Chrome”, represented by 3 dots at the top right of the browser / Settings.
Go to Configuration > Advanced Settings > Privacy and Security > Manage Certificates. In the window that opens, select the certificate to export and click the “Export” button. This will open a Windows wizard for exporting certificates.
Once in the wizard, the first thing to do is to decide whether we want to export the private key, if it is exportable, or not. If we want to use the certificate in another device, we will have to do it.
The format must then be selected:
- Personal Information Exchange Format: if the certificate has a private key, in this case we will have to write this password.
- Message Encryption Syntax Standard: if you want to export several certificates of a file from one computer to another.
- X.509 encoded binary DER format: if the certificate is to be used in more than one operating system.
Finally, the certificate is stored in a file created during the export. File that we will have to name and decide in which folder to place it.
Exporting a digital certificate in Mozilla Firefox
To perform the export in Mozilla Firefox, click on the top right button with 3 horizontal lines. Then go to Options > Privacy & Security > Certificates > View certificates.
Select the certificate to be exported and click on “Make copy”. Name the file where the certificate will be saved, as well as its location. If the certificate has a private key, you will have to enter it.
Exporting a digital certificate in Internet Explorer
In the case of wanting to export a certificate that is in Internet Explorer we must go to Tools > Internet Options and, within that window, to the “Content” tab, click on “Certificates” and go to the “Personal” tab.
From the list of certificates that will appear, we look for the one we want to export, click on it with the right mouse button and select “All Tasks” > “Export”.
At this point, the same wizard will open as in the case of Google Chrome. This is because the Google browser uses the Internet Explorer certificate store.
Exporting a digital certificate with Opera
In the case of the Opera browser, to install a digital certificate we must go to the browser options. To do this, click on the “Settings” button and look for “Go to complete browser settings” > “Security” > “Manage Certificates”.
As in the other search engines, we will access the wizard and it will guide us through the final steps.
We hope that with this simple guide you will find it easier to install and export a digital certificate on Windows devices, regardless of the browser you usually use to perform administrative procedures.
We tell you how to get the digital certificate and how to check its validity. We also explain all its… What is a digital certificate for? Protect your identity What happens if your digital certificate has expired?Información relacionada

How to get a digital certificate?

What is a digital certificate used for?

What happens if the digital certificate has expired?